This guide accompanies my talk at the Independent Games Summit 2018 “Tech Toolbox” session. That talk was only 8 minutes, and intended to make the case that small development teams should invest in improving their infrastructure. Its core thesis was:
- You are probably overestimating the difficulty/cost
- You are probably underestimating the benefits
Hopefully, I convinced you, and here you are. Or maybe you found this post via some other means. I will attempt to start you down the path of improving your technical setup in three areas:
- Robust, redundant storage systems
- Hypervisor hosts to run virtual machines
- General networking recommendations
It is surprisingly easy to go down a rabbit hole of endless options for each of these areas. I will try to make concrete recommendations, both for ideal and shoe-string budgets.
A disclaimer: I am based in the US, and these links and prices will relate to the US market. My understanding is that prices and availability for used server gear get worse, in ascending order, for: Canada, Europe, Australia, the rest of the world.
Storage Systems
Two years ago, I wrote about backups and data preservation. This section will include that information, but also approach storage from a more general perspective.
Your storage should have the following characteristics:
- Highly available (probably an independent piece of hardware, so i.e. updates to some unrelated computer/services don’t also take it down)
- Redundant (resistant to hardware failure–able to withstand one or more HDs/SSDs failing without data loss)
- Backed up (it’s easiest if the storage system manages its own backups)
- Performant (this will be highly dependent on your workflow, but able to host the storage side of virtual machines especially)
Generally, the easiest way to expose your storage systems to the rest of your setup is via network shares. If your team is larger, you may want to create user accounts for each team member in order to have granular control of logs (who changed/deleted what), and access to various network shares. The easiest setup is simply to use one universal account/password, if the team is small enough that trust/turnover isn’t a problem.
Your storage systems should be impervious to failure. Once a file is copied to your trusted shares, it simply exists forever, always. Versioned backups move it to multiple destinations. Local snapshots protect it from accidental deletion. It shouldn’t matter if a single HD dies from natural causes, or your office burns to the ground. The data survives.
Tommy Refenes’ backup system:

Surprisingly, it is not that difficult to achieve this level of protection! And I don’t think it’s overkill either. If we’re talking about bits that you created–if those bits are destroyed, they’re gone.
The production benefit of robust storage is that it becomes very easy to save everything, and to save it centrally. During a game’s development, it’s easy to spread out, with some source files on your local computer (maybe a high-res banner PSD for a trade show). Move these things to your central storage. You will certainly want them later, at some point, even if it’s months or years down the road.
“Just Tell Me What to Buy”: Storage Systems
Synology DS1817+
Synology units are expensive. They’re easily +50% the cost of using server-grade or custom-built (whitebox) equipment. But they’re worth it. They’re reliable, low power, and the built-in applications will easily cover your backup needs.
This is the only component I recommend buying new. By all means, buy a used one if you can, but the used market for recent Synology units is almost nonexistent.
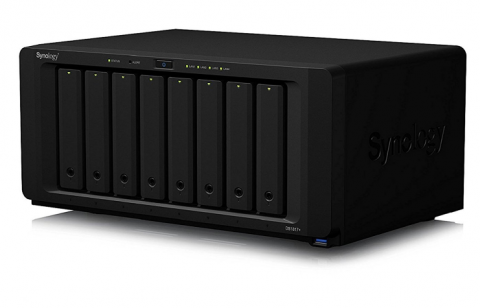
The Synology DS1817+ has a PCI expansion slot for 10gbe networking or M.2 adapter. While it isn’t on the Synology compatibility list, a $17 Mellanox ConnectX-2 card will work, if you do need 10gbit (more info in the networking section).
DSM, the operating system, is capable of hosting more services, including virtualization. The DS1817+ is quite underpowered, though, and in general I recommend separating your storage as much as possible from the rest of your services.
HDs and SSDs
I prefer to use separate volumes for high-performance data, like important VMs, and general storage for everything else. (The other approach is to use tiered storage with a caching layer over the top of your HD storage, but I find it adds complication and doesn’t perform nearly as well as pure SSD-backed volumes).
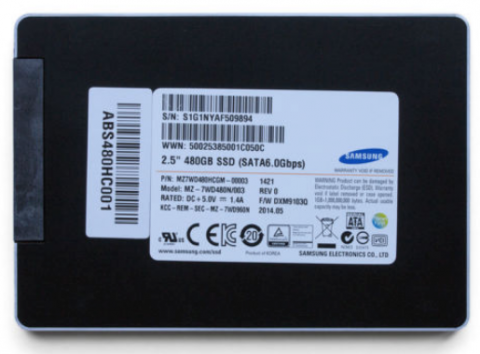
Enteprise SSDs
Enterprise SSDs have massively improved lifespans over their consumer counterparts, to the point where buying them used on eBay will still outlive a new consumer drive.
eBay links go stale quickly, but you should be able to find used drives easily. Ideally, you can find a server pull with zero hours of actual usage, like this one:
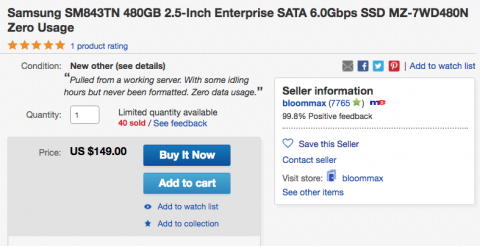
This is a Samsung SM843TN. The specs on this drive are 1.8 DWPD–it can sustain rewriting the entire drive, 1.8 times per day, for 5 years. (Intel data center SSDs can do 10 DPWD, but that’s basically for thrashing a drive with hot caches on heavy database applications).
Your minimum config for SSD-backed storage should be two drives in RAID 1 (mirrored).
Shucked HDs
Currently, the best deal for high capacity HD storage is to shuck the WD easystore 8TB external drives to obtain WD Reds. These are sold by Best Buy, which means they’re only easily available for the US market. They regularly go on sale for $160-180, which is a substantial savings over the $260 retail price.
Shucking these drives retains their warranty, since you can get inside without breaking friction locks or anything on the enclosure. Retail/OEM Red drives have an extra year of warranty, but otherwise they’re identical.
These sales come and go. Up-to-date easystore information is available in this /r/datahoarder thread.
Other HDs
Ideally, use NAS-rated drives for your storage system. These are the WD Red series (or Gold, which is their data center edition), HGST NAS drives, etc.
Avoid “surveillance” or “archive” drives. These use SMR technology. They’re fine until they fill, and then performance implodes. Literally, these drives overlap internally by writing multiple tracks at once. Once they’re full, writing new data isn’t possible without destroying old data, so a new write actually means reading the adjacent data (that’s about to be destroyed), so it can be written again with the new data. More info here about SMR technology if you’re curious.
Other Recommendations: Storage Systems
Maybe Synology rubs you the wrong way, or you want something cheaper (especially if you have some hardware around already). A couple of alternative starting points:
- FreeNAS is a popular ZFS-based NAS operating system. It’s capable of very high performance, but at the cost of complex setups. Make sure you research FreeNAS and ZFS thoroughly if you go this route–you’ll need a lot of memory, and misconfiguration (i.e. uneeded L2ARC) can actually severely degrade your performance.
- unRAID is a popular, commercial NAS operating system. unRAID uses a drive parity system that support differently-sized hard drives. This is a great option if you have an older computer around, and a bunch of miscellaneous drives, and want to centralize everything with some proper redundancy.
- StableBit DrivePool is windows software that can pool existing drives without reformatting them. It supports per-folder duplication (although not parity, so 2x duplication doubles your storage costs, etc). This is a great option if you already have a Windows machine acting as a server and you want to improve its redundancy and performance.
- XPEnology is a bootloader that allows Synology’s DSM operating system to be used on non-Synology hardware. This is made possible because DSM is based on BusyBox, a kind of embedded Linux, which is GPL’ed. I mention it here because it does allow the convenience of DSM without the premium price tag of Synology hardware. It’s easiest to use virtualized in order to minimize hardware variation. I actually run several XPEnology installs in my personal setup–feel free to email me if you want to go this route and get stuck on something!
Other storage hardware notes:
- Dell R510s are solid 8-bay, 2U servers, for $300-600, depending on included drive trays and CPU specs.
- For more bays, look up beastly 24- or 36-bay Supermicro systems.
- For whitebox builds, the cheapest storage controller is to cross-flash a Dell H200 or H310 to “IT mode”. These cards are $30-40 on eBay, or $60 if you just buy a pre-flashed one. They support 8 internal SATA drives with two of these forward breakout cables.
- If you need to add a bunch of bays to an existing system, a ThinkServer SA120 DAS is a great option. You’ll need something like an LSI SAS9200-8e card for it (~$30 on eBay). Note that the default fan speed is quite loud, so you’ll need to use the ThinkServer Windows fan controller or this script on Linux to drop them down every time you power cycle the DAS. This is a XPEnology compatible setup!
- If your business is very storage dependent, and you need LOTS of storage and LOTS of performance, consider a Storinator. These run FreeNAS.
Hypervisors (Virtual Machine Hosts)
The second key piece of technology in improving your indie team’s infrastructure is to use virtual machines. For everything. Honestly, with the ease of use and benefits of virtual machines, nothing you run as computing infrastructure should be run on bare metal.
Virtual machines emulate real-world hardware components. A virtual machine “computer” will still have a video card, a hard drive, and a CPU, except all of these things will now be in quotes. Your virtual hard drive will be backed by your storage system, your video card will likely just be a blob of memory, etc.
From the perspective of the operating systems you’re running as guests–Windows, Linux, macOS–they simply think they’re running on hardware. You don’t need a special version of Windows to run inside a virtual machine.
Why Virtual Machines?
- Consistency of hardware. From the guest operating system’s point of view, the hardware will be totally unchanging, even if you move the virtual machine to a new host. This is especially important for software that has activation licenses tied to hardware identifiers. No longer will your Unity build machine break because you forgot to deactivate your old license before a major hardware upgrade.
- Elastic performance. It is possible to scale a machine’s resources up and down as a required. As a real-world example: I used three Windows virtual machines for Aztez porting: Xbox One, PS4, Nintendo Switch. As I focused on each platform, it was a trivial few clicks to give that virtual machine more CPU cores for faster compile times.
- Host-to-host mobility. Also on Aztez, I used two virtual machine hosts: One optimized for fast single-core performance, and one for general computing (with more memory and total cores). It was easy to move virtual machines around to their best-suited host. Need to bring your build VM with you to a conference/event in order to deploy to hardware? Just copy it to a laptop and run there (I did this for some events where we had to deploy to Xbox One demo hardware).
- Unified storage. My virtual machine hosts have no local storage; they use the Synology for everything over the network. If I improve storage performance, this is available to all machines that use it.
- Automatic backups. Because I perform backup tasks at the storage level on the Synology itself, all of my virtual machines are automatically included. These backups happen using filesystem snapshots–so even if a backup takes an hour to upload or copy to an external drive, the data being backed up will be exactly as it was at the start of the process. I have daily, versioned backups of all of my virtual machines, and can roll back to any version with a few clicks (I’ve done this more than a few times with something like an update unexpectedly trashes a project).
Hypervisor Types
There are two classifications of hypervisors:
- Type 1 (bare metal). These are essentially stripped-down operating systems that only run other virtual machines. They are usually managed remotely, either via an API and associated programs, or via a web interface provided by the OS. This guide will focus on ESXi, VMWare’s type 1 hypervisor.
- Type 2 (hosted). If you’re already played around with some virtual machine stuff, you’ve likely used a hosted hypervisor. These run as normal programs underneath a commonplace host OS (Windows, macOS, etc). Examples would be something like VirtualBox or VMWare Workstation/Player. While it is possible to run your virtual machine infrastructure with a type 2 hypervisor, in practice the downsides become cumbersome. Consumer operating systems need to be updated/rebooted pretty frequently, which will take down all the guests with it.
VMWare ESXi
ESXi is a bare metal hypervisor from VMWare. ESXi has a free license available, with three limitations that might affect you:
- Maximum of two physical CPUs on your host
- Maximum of 8 virtual CPUs per guest
- Can’t add it to a vCenter Server (more on this in a second)
I use ESXi for a few reasons:
- VMWare Tools, their driver package for guest operating systems, supports DirectX 9 acceleration (software-emulated). As a game developer, this is huge. The Unity editor will run, and I can press play, which makes debugging weird issues in i.e. a platform-specific VM a lot easier to handle.
- It’s quite prevalent in the “real world”, which makes finding information and tutorials a lot easier.
- The virtual machines on ESXi are compatible with their desktop software (VMWare Workstation on Windows or VMWare Fusion on Mac). This means it’s possible to take a VM with you to an event where you might be offline and need access to something.
VMWare’s Ecosystem and Terminology
Honestly, one of the most confusing things about VMWare’s offerings is making sense of their vast array of products and terminology. In case it helps:
- “vSphere” refers to the hypervisor. When a document is referring to vSphere, they’re referring to ESXi. Most people use ESXi when they’re talking about standalone setups, and vSphere when they’re talking about clusters.
- VMWare has an older hypervisor called ESX. This is a totally different thing!
- The higher-end of their offering is vCenter Server, which takes control of multiple ESXi hosts. vCenter has its own API/UI/web interface to manage hypervisors that are part of a vSphere cluster.
- The free license doesn’t include of the vCenter/vSphere fancy tech. It’s pretty neat, though–you can do things like live-migrate a VM between two hosts without shutting it down, run high-availability guests that can jump hosts in case of hardware failure, etc.
- VMWare Horizon is a server-and-dumb-terminal system where user’s desktops are really virtual machines, with infrastructure to deploy applications in a hybrid way so they’re still responsive (or something).
Installing ESXi on a Computer
- ESXi is notoriously picky about its hardware compatibility list. As long as your network card is included, you should be okay. If it isn’t, Intel NICs are pretty cheap on eBay (a quad Intel NIC should run ~$30). Really, this only matters if you’re getting support direct from VMWare, which isn’t included in the free license anyway.
- Get a free ESXi license. ESXi installs itself with a 30-day trial of all features. The free license does not expire.
- Install ESXi. ESXi is small, and performs no writes to its boot media after it comes up. Most people just install on an internal 2.0 USB thumb drive. Servers usually have internal USB ports. If you’re installing on commodity hardware, get one of these cables for an unused motherboard header (just make sure you check the pinouts so you don’t install it backwards!).
- After ESXi boots, it will try to pull an IP from DHCP on your network. You then connect to this management IP with a web browser to access the ESXi web interface.
Configuring ESXi
- To create a VM, you’ll need to mount or create a datastore. I don’t like using local (to the host) storage, but if you are, you’ll just format whatever drives are in your ESXi host. If you installed ESXi to an internal drive and not a USB thumstick, you should already have a formatted datastore on that drive.
- I prefer mounting datastores over NFS. This guide shows the Synology side of the interface. The screenshots there are from the standalone Windows program to manage ESXi hosts, but the workflow is the same on the web.
- Another option for mounting datastores from a Synology or similar NAS is to use iSCSI, which treats a remote chunk of storage as a chunk of addressable blocks (very similarly to how your hard drive shows up to your OS as a bunch of blocks). iSCSI is slightly faster than NFS, but I like how NFS keeps everything as loose files. It’s easier to browser or manually edit files in the VM folders, move things externally, etc.
- If you are using the recommend dual-volume approach from the above storage section, one for SSDs and one for HDs, you’ll want to mount two datastores, one to each shared folder. I usually make shared folders like “VMSSD” and “VMHD”.
Creating Your First VM
- When you create a VM, the easiest way to install the operating system is to mount an ISO into its virtual DVD-ROM drive. So just copy the right ISOs somewhere on the datastores (another reason I like using NFS instead of iSCSI).
- Use the web interface to create a new VM! This is pretty self-explanatory in the interface. This guide walks you through it anyway, if you want some screenshots.
- Voila! The web interface provides an HTML5 mechanism to control the virtual machine. The VMWare Remote Console provides a standalone program to control a VM, which will have better performance.
- With default settings, your VM should show up on your local physical network as its own MAC address, which will get an IP from your local DHCP server.
Fancy Things with ESXi
Whew! That was a lot of info. I swear it isn’t as bad as it looks as a wall of text. Now that you have an ESXi host running, you should be aware of a few things:
- It’s possible to run a virtual network purely inside your ESXi host. The VMWare networking paradigm uses “virtual switches” and “port groups”. By default, you have one port group for your VMs, which is using the one default virtual switch. A virtual switch is exactly what it seems–your VMs are connected to it, and then you can uplink it to your main network with a physical port. If you have a virtual switch with no uplink to your physical network, it will VM-only.
- If you’re planning on an interconnected multi-VM setup, and also are in a situation where your VM host might be moving between physical locations frequently, you might want to set up an entirely virtual network inside the host (with a virtualized router to hand out IPs, etc). The benefit here is that all internal IPs will remain consistent, even if you move the host around to different parent networks. The downside is that real machines need to find some way into this network. More on this later.
- ESXi can pass-through actual hardware to a guest. This is commonly used for virtualizing NAS systems by passing through an HBA controller card (FreeNAS, unRAID, XPEnology, etc). But, you can also pass through things like video cards. This might be useful if your build system requires a beefy GPU in order to bake lightmaps, etc.
- A note on GPUs: NVIDIA’s Windows drivers detect VMs and disable themselves (presumably so they can sell more server-class headless GPUs). There are workarounds–basically disable the CPU ID that identifies as virtual. Google for guides.
- Passing through USB controller hardware is useful for console dev kits. For instance, I pass through some USB ports to our Nintendo Switch VM in order to connect our dev kit for debugging. There are high-end USB controller cards where each port is its own controller chip, which lets you pass through each port to a different VM.
- My desktop is actually a virtualized macOS, with a GPU and USB controller passed through.
- Speaking of Apple–virtualizing macOS is a supported configuration, but officially only if your host machine is Apple hardware (i.e. an older Mac Pro). It is possible to patch ESXi to remove this restriction for all Intel hosts, but it doesn’t work on the very-latest ESXi. If you need to virtualize a lot of Apple stuff, maybe to retain build machines for various iOS versions or whatever, it’s probably worth getting a MacPro5,1 running ESXi.
Other Recommendations: Hypervisors
If closed source systems aren’t your bag, or you’re worried about VMWare pulling the rug on their free license for ESXi, here are some other bare metal hypervisors:
- Proxmox is the primary alternative. It’s open source, frequently updated, and recently has started including a lot of extra functionality (i.e. ZFS is now available for host-managed storage). It uses KVM/Qemu for full virtual machines.
- unRAID also offers virtualization via KVM/Qemu.
- Windows Hyper-V is the Microsoft solution. It’s available in Windows Server and Windows 10 Pro. I know nothing about it!
- Xen is commonly used by commercial hosting providers. I think most of it is behind their commercial version, though.
“Just Tell Me What to Buy”: Hypervisor Hosts
This is a harder recommendation to make, because it’s very dependent on your team size, how many projects you have running concurrently, how much of your stuff like source control systems is local versus cloud-hosted, etc.
There’s also a big difference between server hardware and workstation/desktop hardware. To break that down:
Use server hardware if:
- You have a separate or off-to-the-side physical space to house them. All servers are louder; some are very loud. You almost certainly do not want to put a bunch of servers 10-15 feet away from people who are working.
- You will rarely have physical access to them, and need remote access for setup/troubleshooting. Servers have technology (i.e. iDRAC for Dell, ILO for HP) that let you get a remote view of the video output, remote control of keyboard mouse, ability to mount an ISO remotely. This sits totally outside the normal CPU/system, so you can do things like edit bios remotely, fix that “press F1 continue” issue on boot, etc.
- You have a rack and need/want rack-mounted gear. Servers on rails in racks are much, much easier to access for physical troubleshooting and upgrades.
Use workstation/desktop hardware if:
- You’ll be the same room and want something quieter.
- You already have hardware lying around!
Finding Servers
The best place to buy servers is probably eBay. eBay fluctuates constantly, so it’s hard to link here. LabGopher is a great tool for browsing current listings:
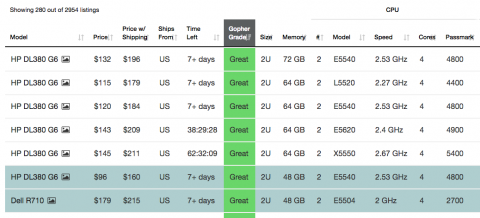
If you are on a strapped budget, you should be able to find a Dell 710 with ~48-64GB of memory for ~$300 or so. The absolute cheapest servers are surprisingly cheap. Just browse LabGopher for a bit, and use common sense with eBay seller ratings.
For a more powerful setup, jump to the E5-2xxx series of processors, available in the Dell X20 line (i.e. a Dell R720 for a 2U setup).
Workstation Recommendations
The best recommendation I have for quieter workstation-class systems is the HP Z620 or Z820 lines. Unfortunately, memory prices have been rising steadily for the last year, so at the time of writing prices are back up.
But, you should be able to get a Z620 w/ 64GB of memory for ~$800, or a 16-core, 128GB memory Z820 for ~$1400. The Dell T7600 workstations are good options for E5 processors too.
Networking
Many people look overlooking improving their networks. A couple of a quick tips in this section:
10 Gigabit
Most everything is gigabit networking these days. Gigabit is slow! 100MB/s speeds are well under all storage hardware these days, especially SSDs. While it is possible to use multiple gigabit connections to storage or servers, this isn’t a simple multiplier on speed (it only really helps for multiple streams, like an office full of computers all accessing the same storage host).
10 gigabit can be fairly expense. A few notes there:
- You should be able to saturate 1,000MB/s with a beefy storage setup. You can get pretty good speeds out of HDs setups with more HDs/spindles in the mix (i.e., if you were a video house and got a 24-bay setup going, it could easily perform there).
- It’s surprisingly cheap to run a direct host-to-host connection, i.e. to connect your storage to your VM hypervisor. You’ll want two SFP+ cards and a direct attach cable. Total cost should be $17/ea for the cards and $20 for the cable. Two-port cards are available, which means it’s easy to run a small cluster of two VM hosts (or also to connect a workstation).
- For a direct connection, just assign static IPs without gateways in a new range (ie. 10.10.10.10 and 10.10.10.11 or something). On ESXi, you’ll need to add a new host-side network with a new VMKernel NIC, a new port group for storage, a new virtual switch, and then uplink the virtual switch to the physical NIC port.
- Routing and switching 10 gigabit is expensive. ($300-600 for “cheap” switches).
- SFP+ (fiber or DAC copper) is much, much preferable to RJ45 10gbit. The only real exception here is if you already have lots and lots of RJ45 ethernet runs in your office, and they’re 10gbit compatible. Otherwise go with fiber. RJ45 power consumption is much, much higher, fiber is actually surprisingly cheap, etc.
- Adding 10gbit to Apple laptops is a huge pain. Your best option is actually an external Thunderbolt enclosure with an SFP+ card inside. This is hundreds of dollars, sigh.
Remote Access and Bridging Networks
Very commonly, especially for distributed teams, you want to be on the same network as each other. This makes it easy to access “local” resources like network shares without the security risks involved in exposing all of these services to the broader Internet.
The absolute easiest way to do this is to use ZeroTier:
- The simplest setup is to install ZeroTier on every computer that needs to talk to each other. Virtual networks are centrally managed by their website control panel. Install ZeroTier on a new machine, join network, approve the device, and you’re done.
- The downside here is that everything needs to have ZeroTier installed on it. The more advanced solution is to have a device on your network acting a bridge. I do this on my setups–I have a small VM for a ZeroTier bridge. This bridge lets any device on a ZeroTier network access everything on the network the VM is connected to.
Managed Switches and Fancy Setups
Most people use basic, unmanaged switches in their setups. You plug in a bunch of devices, everything works, and packets route around based on MAC addresses. There’s one, single network in place.
The next step up is to start using managed switches. Managed switched understand VLANs, which are an extra piece of info in an ethernet frame (literally just an arbitrary number). VLANs make it very, very easy to run multiple networks on the same physical infrastructure. A very common use case here is for guest networks–if you connect your wifi device to a different SSID, you end up this network, or you can specify certain ports on managed switches, etc.
When we shut down the Team Colorblind/Aztez office, I needed to absorb that infrastructure into my home network. I ended up virtualizing all services–storage, router, etc–into a single VM host. I copied the physical router config into this new virtual router, so all static DHCP IP assignments and everything remained intact with our existing VMs running builds, source control, and so on.
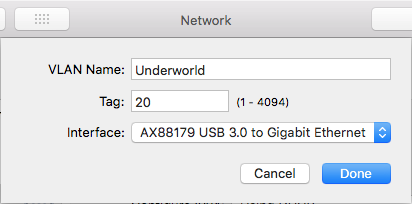
Now here’s the neat thing: This virtual router is uplinked back into my main network, tagged with a VLAN. So for instance, on my laptop I can add a new virtual device with this VLAN:
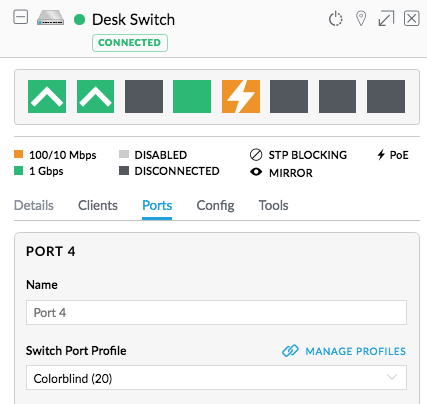
With managed switches, I can also control VLANs at the port level. Our console dev kits use this now-virtualized network, because I’ve set their ports to automatically add VLAN tags outbound (and to strip them inbound):
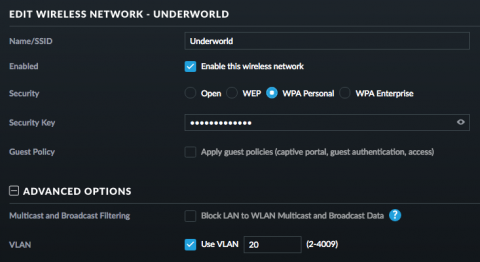
Additionally, I have my access points set up to broadcast an SSID that gets this VLAN tag, for any wireless devices that need to talk to this network-in-a-network:
“Just Tell Me What to Buy”: UniFi
These networking screenshots are from Ubiquiti’s UniFi line. It’s a great system. You need to run their controller software somewhere, but this is easy if you have a 24/7 VM host running.
If you use their router, their switches, and their wifi access points, you have a very, very useful centralized view of your entire network:
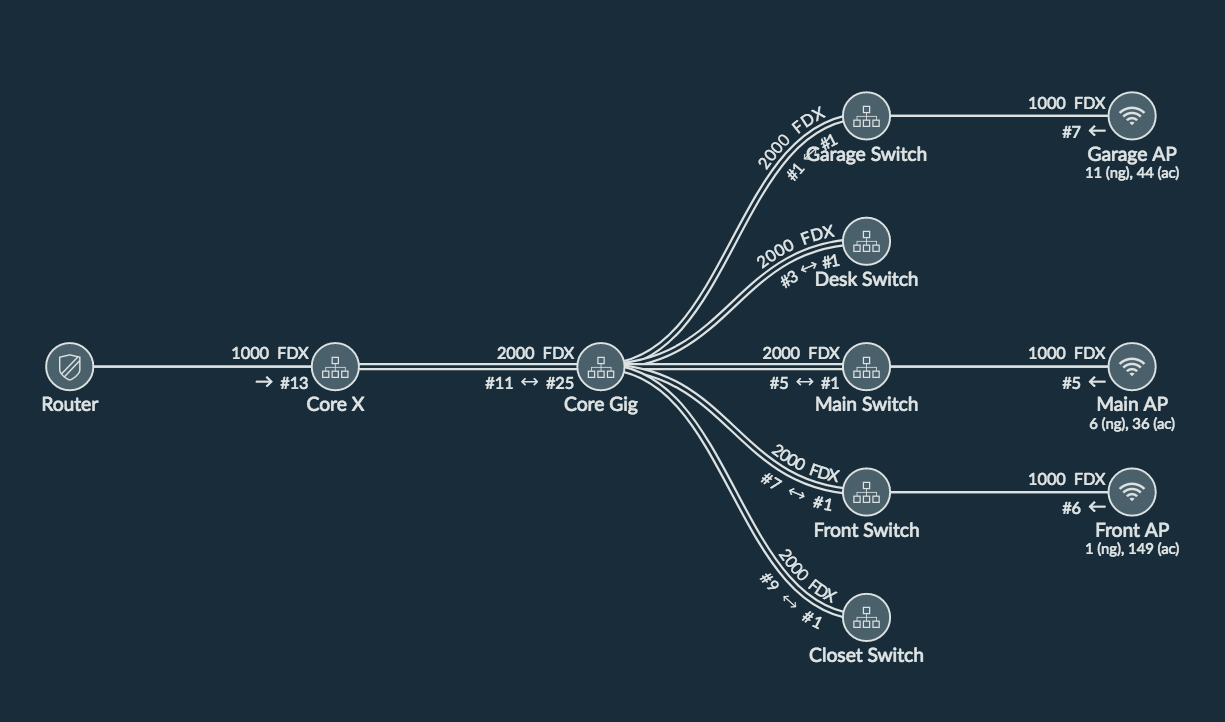
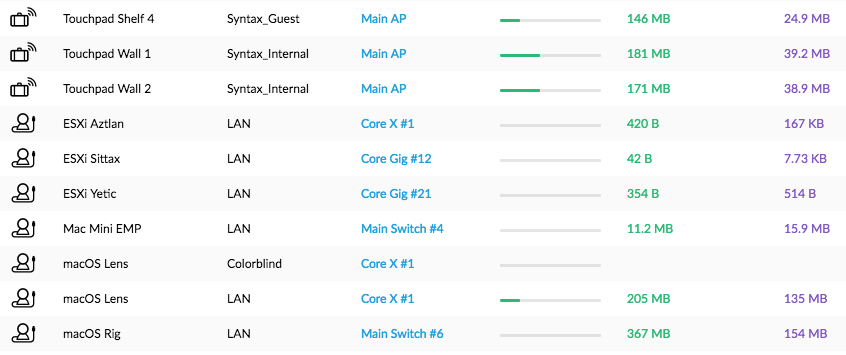
And a screenshot of the list of clients–notice that the AP or physical port location is listed too:
A complete UniFi setup needs their router (“security gateway”), one or more of their wireless access points, and some of their switches (“PoE” = power of ethernet, which can power their access points, cameras, etc).
If you already have a solid router and network equipment in place, but your wifi is terrible, run their access points. They’re great.
(Small P.S. in the networking section–I no longer recommend pfSense for toxic company/community reasons)
Additional Links + Resources
Congrats! If you’re still reading, you’re probably committed to running some pretty substantial home/small office infrastructure. Here’s some random bits of info for where to go next:
- Reddit’s /r/homelab is a very useful place. Dense posts regularly roll through, but also check the wiki for collections of information (i.e., the hardware buyer’s guide there). There are a surprising number of individuals running full 42U racks at home.
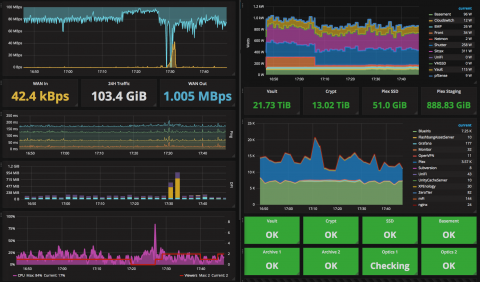
- Grafana is a very easy-to-use graphing and monitoring system. You’ll likely want to pair it with InfluxDB as the data backend and Telegraf for specific machines. Here’s my setup:
- U3D is a great wrapper for command-line Unity builds.
- $5/mo Digital Ocean droplets are surprisingly powerful. TIGSource Forums, IGF submission system, etc, are all on $5/mo tier VPSes (one per). Use ServerPilot to set them up. Badly-performing websites are almost certainly just badly-configured software stacks (a $5/mo DO droplet should be able to do 500+ requests/second with WordPress).
- Should you use a rack? If you have the space, and live in a city with lots of Craigslist activity, go for it. Don’t buy a rack new unless you’re made of money.
- The more you build out your own infrastructure, the more paranoid you become about data. After all, you have the ability to ensure the longevity of your own data. You should. Back up your Gmail daily. Keep local copies of your GitHub repositories in sync. Set up your Synology to do a download-only copy of your Dropbox/Google Drive/etc accounts (and include those folders in your nightly, versioned backups). If something you created exists, but solely exists in the hands of other companies, fix that.
- With managed networking in place, it’s easy to create an isolated Internet-of-Things subnet that can’t talk to the Internet. Prevent network egress any weird and cheap power monitor/camera/etc devices you might have.
- With a VM system, camera surveillance becomes much cheaper–all you need now are the cameras themselves. There are a lots of options available, especially if you dip into the Chinese imports available on Amazon. Blue Iris is the best camera software you can run locally.
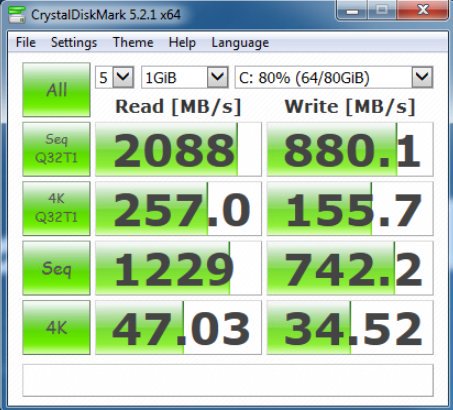
- VM-to-VM networking on the same host is pretty darn fast. Here’s a benchmark of an 8-SSD array, with the ESXi host mounting a datastore to a NFS share on a virtualized Synology setup:
Questions? Missing Info?
This document is basically a brain dump of the infrastructure I’ve explored while making Aztez and doing contract work. It isn’t meant to be the ideal, best way of doing things–just the things I’ve learned. You might notice that some categories are entirely absent (i.e. containers instead of full VMs).
That said, if you’d like to contribute, or you have some questions about something I mentioned that doesn’t seem to work, please feel free to contact me, either email or Twitter @mwegner. I like talking about this stuff!